Missivus for Matomo — send Matomo email through Microsoft Graph with application permissions and a shared mailbox. No SMTP, no user login. Free, GPLv3.
Matomo has no email API. It sends only through PHPMailer, over SMTP or PHP's mail(). For Microsoft
365 that means SMTP AUTH with basic authentication — a licensed user's password stored on your
server as a shared credential, on a path Microsoft is retiring: disabled by default for existing
tenants from the end of December 2026, unavailable to new tenants from 2027, with final removal to
follow. Matomo's PHPMailer path cannot do the OAuth2 SMTP that replaces it. Sooner or later the
password resets, scheduled reports and alerts stop.
Missivus replaces Matomo's mail transport with one that posts to the Microsoft Graph API using OAuth2 client credentials and the Mail.Send application permission, sending as one shared mailbox you nominate. Every email Matomo produces goes out that way — there is nothing to switch over report by report.
Application permissions, not a delegated login
The usual Microsoft 365 mailers use delegated authentication: a multi-tenant app, a redirect URI, and a human who clicks "Connect" so that mail goes out as their account. That is the wrong shape for a server. It breaks when that person leaves, when their password changes, and when MFA policy tightens.
Delegated mailers Missivus Who sends A named person's account A shared mailbox Setup A human clicks "Connect" Nothing to click Survives an employee leaving No Yes Mailbox licence needed Yes No Scope Whatever that person can reach One mailbox, enforced by Exchange Cost Often a paid extension Free, GPLv3The scoping is what makes this safe. An Exchange application access policy restricts the app
registration to the single shared mailbox, so the Mail.Send permission cannot touch any other
mailbox in your tenant — and the install guide treats that step as first-class, with a command to
verify it actually took effect.
What it does
- Everything
Piwik\Mailsupports: HTML and plaintext, multiple recipients, BCC, Reply-To, and attachments — including the PDFs that scheduled reports generate. - Large attachments never fail on size. Files under 3 MB go inline; anything larger is uploaded through a Graph upload session automatically. There is no setting that can get this wrong.
- Client secret or certificate. A client secret is the quickest way in and is the default; a certificate is supported as optional hardening.
- Secrets can stay out of the database. Any value can come from a
[Missivus]section ofconfig.ini.phpor from an environment variable, which then wins over the settings UI and is never written to the option table. - Nothing fails silently. A Graph failure is logged at error level and, unless you explicitly turn on the fallback, raised. Nothing is swallowed.
- A test-email button that shows you the exact error Microsoft returned.
- No third-party runtime dependencies. Nothing beyond what Matomo already ships, and nothing to
composer install.
What you need
Matomo version Missivus release line Branch PHP Matomo 5.x 0.1.xmain
7.2.5 or later
Matomo 6.x
1.x
6.x-dev
8.1 or later
- PHP with the
opensslandjsonextensions (PHP 7.2.5 or later on the 0.1.x line, 8.1 or later on the 1.x line) - A Microsoft 365 tenant, and an administrator who can create an app registration, grant admin consent, and run one Exchange Online PowerShell command
- A shared mailbox to send from. It needs no licence
Getting started
Install the plugin, then follow the installation guide — it is written for someone who has never opened Microsoft Entra, and every click is spelled out. Budget about an hour for the Microsoft side. The FAQ answers the questions that come up most often, and docs/SECURITY.md is the standing security review.
Missivus is free and open source (GPLv3). If you would rather not do the Entra and Exchange setup yourself, Solvetus offers paid installation and support.
-
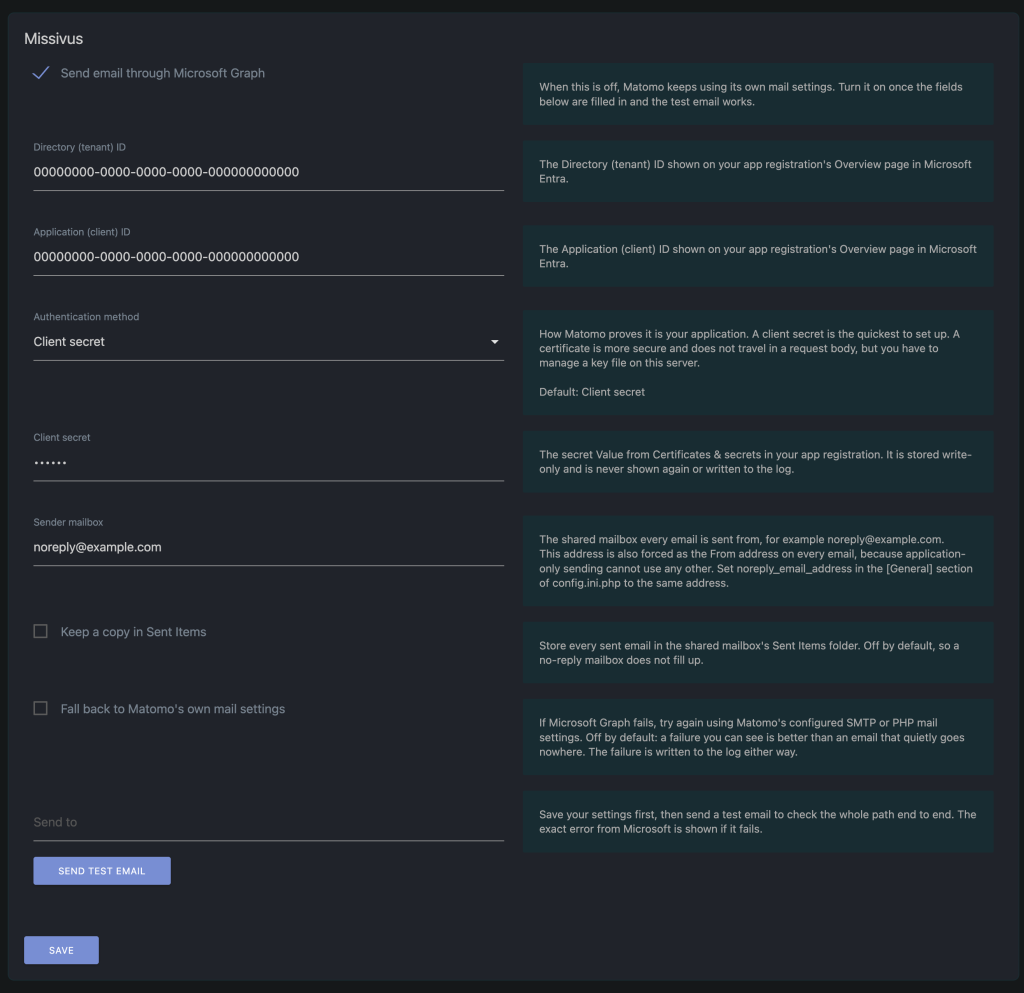
Settings page
-
Test email sent

This guide assumes you have never used Microsoft Entra before. Every click is spelled out.
Pick the release line that matches your Matomo:
Matomo version Missivus release line Branch PHP Matomo 5.x 0.1.xmain
7.2.5 or later
Matomo 6.x
1.x
6.x-dev
8.1 or later
You will need:
- An account in your Microsoft 365 tenant that can create app registrations and grant admin consent — in practice, a Global Administrator or an Application Administrator who is also an Exchange Administrator.
- Access to the server Matomo runs on.
Set aside about an hour. Nothing here is reversible-by-accident; every step can be undone.
Throughout, replace example.com with your own domain and noreply@example.com with whatever
address you want Matomo's email to come from.
Part 1 — Create the app registration
This is the identity Matomo will use. It is not a user and has no password anyone types.
- Go to https://entra.microsoft.com and sign in.
- In the left-hand menu choose Applications → App registrations.
- Click + New registration.
- Fill in the form:
- Name:
missivus-matomo-<your Matomo hostname>— for examplemissivus-matomo-analytics.example.com. Only administrators see this, and naming it after the tool and the host keeps it straight once your tenant holds several registrations. - Supported account types: Accounts in this organizational directory only (Single tenant)
- Redirect URI: leave completely empty. Missivus never redirects a browser anywhere, and an empty value here is part of why this setup cannot be hijacked.
- Name:
- Click Register.
You now land on the app's Overview page. Two values on it go into Matomo. Copy them somewhere safe — they are identifiers, not secrets, so a note is fine:
On the Overview page Goes into Matomo as Application (client) ID Client ID Directory (tenant) ID Tenant IDPart 2 — Grant the permission to send mail
- Still inside your app registration, choose API permissions in the left-hand menu.
- Click + Add a permission.
- Choose Microsoft Graph.
- Choose Application permissions. This is the important choice — not "Delegated permissions". Application permissions belong to the app itself, which is why no human ever has to sign in.
- In the search box type
Mail.Send. Tick Mail.Send. - If Matomo will email attachments larger than 3 MB — which scheduled PDF reports often are —
also search for
Mail.ReadWriteand tick it. Microsoft requires it for the large-attachment upload path: sending a big file means creating a draft first, andMail.Sendalone does not allow that. If you skip it, ordinary email still works and only oversized attachments fail, with an error naming this permission. - Click Add permissions.
- Back on the API permissions page you will see your permissions with a warning triangle and the status Not granted for <your organisation>. Click ✓ Grant admin consent for <your organisation>, then Yes.
- Confirm the Status column now reads Granted for <your organisation> with a green tick.
If the "Grant admin consent" button is greyed out, your account cannot consent. Ask a Global Administrator to click it. Nothing else in this guide requires their involvement.
You may also see User.Read listed as a delegated permission. Azure adds it automatically to new registrations. Missivus does not use it and you can safely remove it.
Part 3 — Give the app a credential
Pick one of these. If you are not sure, pick the client secret: it is two clicks, it is what the rest of this guide assumes, and you can move to a certificate later without reinstalling anything.
Option A — Client secret (start here)
- In your app registration choose Certificates & secrets.
- On the Client secrets tab click + New client secret.
- Give it a description following the pattern
missivus-matomo-<your Matomo hostname>— for examplemissivus-matomo-analytics.example.com— then choose an expiry and click Add. A tenant accumulates app registrations and secrets quickly, and a name that says which tool and which host it belongs to is the difference between confidently rotating a secret and being afraid to touch it. - Copy the Value column immediately. It is shown once and never again. The Secret ID column is not the secret and is not what you need — this trips almost everyone up the first time.
- Put the expiry date in a calendar. Mail stops on that day if the secret is not replaced.
That is the credential. Skip to Part 4.
Option B — Certificate (optional hardening)
A certificate is more secure than a secret: it never travels in a request body, and it can be given
a longer life without the same exposure. It is worth doing if you are comfortable with openssl and
managing a key file on the server — but nothing in Missivus needs it, and a secret is not a second-
class option.
Run this on the Matomo server, or anywhere with openssl installed:
openssl req -x509 -newkey rsa:2048 -keyout missivus.key -out missivus.crt \
  -days 730 -nodes -subj "/CN=missivus-matomo"

# Missivus wants one file containing both parts:
cat missivus.key missivus.crt > missivus.pem
missivus.pemis the file Matomo reads. It is a credential — treat it like a password.missivus.crtis the public half, the only part you upload to Microsoft.
Upload the public half:
- In your app registration choose Certificates & secrets.
- Select the Certificates tab, click Upload certificate.
- Choose
missivus.crt, add a description, click Add. - A thumbprint and an expiry date appear. Put the expiry date in a calendar — mail stops on that day if the certificate is not replaced.
Put the PEM somewhere outside your web root and outside the plugin directory, so a plugin update cannot overwrite it and a web server misconfiguration cannot serve it:
sudo mkdir -p /etc/matomo/secrets
sudo mv missivus.pem /etc/matomo/secrets/missivus.pem
sudo chown root:www-data /etc/matomo/secrets/missivus.pem
sudo chmod 640 /etc/matomo/secrets/missivus.pem
rm missivus.key missivus.crt      # no longer needed on this machine
Use www-data or whichever user your web server runs as.
If you choose this option, set Authentication method to Certificate in Part 7 and give the path to the PEM instead of a secret.
Part 4 — Create the shared mailbox
A shared mailbox needs no licence, which is the point: Matomo gets a real, monitorable mailbox for free.
Make it a company-wide no-reply address rather than a Matomo-specific one — noreply@example.com
with the display name set to your company name, not matomo@ or Matomo Analytics. Recipients see
the display name, and "Example Ltd" reads better in an inbox than the name of your analytics
software. It also means the next tool that needs to send email can reuse this same mailbox: each
tool gets its own Entra app registration, scoped to this mailbox by the same kind of application
access policy, so their credentials stay completely separate while the address your customers see
stays consistent.
- Go to https://admin.microsoft.com.
- Choose Teams & groups → Shared mailboxes.
- Click + Add a shared mailbox.
- Set the name to your company name — for example
Example Ltd— with the addressnoreply@example.com. - Click Save changes. Give it a few minutes to appear everywhere.
Do not add any members. Nobody needs to sign into it.
Two optional bits of hardening while you are here. Both are worth doing and neither changes anything for Missivus, which talks to Graph and needs none of these protocols:
- Mailbox → Email apps: switch off Outlook desktop (MAPI), Exchange web services, ActiveSync, IMAP, POP3 and Outlook on the web. That closes every sign-in route into the mailbox.
- Mailbox → General → Hide from address list: turn it on, so a no-reply address does not clutter colleagues' address pickers or invite replies.
Part 5 — Lock the app to that one mailbox
Do not skip this. Until you do, the Mail.Send permission you granted in Part 2 lets the app
send as anyone in your tenant. An application access policy narrows it to the single shared
mailbox, and it is what makes this whole model safe.
How it works, in one paragraph. Exchange cannot point a policy at a single mailbox — it can
only point one at a group. So you create a security group whose only member is the shared
mailbox from Part 4, then tell Exchange "this app may only touch mailboxes in that group". The
group gets an email address of its own (noreply-apps@yourcompany.onmicrosoft.com below), but nobody ever sends
to it or from it; it exists purely so the policy has something to point at. Your shared mailbox
stays exactly as you created it.
You need PowerShell with the Exchange Online module. Windows has PowerShell built in; on macOS run
brew install --cask powershell and then pwsh; on Linux see Microsoft's install page. Everything
below is typed into that PowerShell window, one command at a time.
Before you start, have two values ready:
- the value shown in the Application (client) ID field on your app's Overview page (Part 1) —
a long identifier like
1a2b3c4d-5e6f-7a8b-9c0d-1e2f3a4b5c6d. Below it is written asPASTE-APPLICATION-CLIENT-ID. - the address you sign in to https://admin.microsoft.com with. This is often not your normal
email — many tenants use a separate admin account such as
admin@yourcompany.onmicrosoft.com. Use that one; below it is written asadmin@yourcompany.onmicrosoft.com.
How to fill in the commands. Wherever you see PASTE-APPLICATION-CLIENT-ID, replace only
those words with the Application (client) ID and keep the quotation marks around it — so
-AppId "PASTE-APPLICATION-CLIENT-ID" becomes
-AppId "1a2b3c4d-5e6f-7a8b-9c0d-1e2f3a4b5c6d". Same for example.com and the admin address.
Change nothing else on the line.
Step 1 — install the module and sign in (a browser window opens; sign in with the admin account):
Install-Module -Name ExchangeOnlineManagement -Scope CurrentUser
Connect-ExchangeOnline -UserPrincipalName admin@yourcompany.onmicrosoft.com
Step 2 — create the group. One line. Its only member is your shared mailbox:
New-DistributionGroup -Name "NoReply Apps" -Alias noreply-apps -Type Security -Members "noreply@example.com"
PowerShell prints the group it created. Note the PrimarySmtpAddress it shows. It is usually
not on your normal domain but on your tenant's built-in one —
noreply-apps@yourcompany.onmicrosoft.com. If you are unsure, run
Get-DistributionGroup -Identity noreply-apps | Format-List PrimarySmtpAddress and copy the value.
That exact address is what goes in the next command; using the wrong domain gives
The identity of the policy scope could not be resolved.
Step 3 — lock the app to the group. One line. Paste the Application (client) ID and the group address from Step 2 inside the quotes:
New-ApplicationAccessPolicy -AppId "PASTE-APPLICATION-CLIENT-ID" -PolicyScopeGroupId "noreply-apps@yourcompany.onmicrosoft.com" -AccessRight RestrictAccess -Description "Missivus (Matomo) may only send as noreply@example.com"
Step 4 — wait 5–10 minutes, then check it took effect. Two commands; paste the same Application (client) ID in both. In the second, use any other mailbox in your tenant — your own email address is fine:
Test-ApplicationAccessPolicy -Identity "noreply@example.com" -AppId "PASTE-APPLICATION-CLIENT-ID"
Test-ApplicationAccessPolicy -Identity "you@example.com" -AppId "PASTE-APPLICATION-CLIENT-ID"
The first must show AccessCheckResult : Granted. The second must show
AccessCheckResult : Denied. If the second still says Granted, the policy has not propagated
yet: wait and run it again. Do not go further until it says Denied.
Step 5 — pre-flight: send one real email from PowerShell. Optional but strongly
recommended: it proves tenant, app, secret and policy end to end before Matomo is involved, so
any later failure is the plugin's, not Microsoft's. Fill in the three values (keep the quotes):
your Directory (tenant) ID and Application (client) ID from Part 1, and the secret
Value from Part 3. Replace you@example.com with your own inbox.
$TenantId = "PASTE-DIRECTORY-TENANT-ID"
$ClientId = "PASTE-APPLICATION-CLIENT-ID"
$Secret   = "PASTE-SECRET-VALUE"

$tok = Invoke-RestMethod -Method Post -Uri "https://login.microsoftonline.com/$TenantId/oauth2/v2.0/token" -Body @{ client_id=$ClientId; client_secret=$Secret; scope="https://graph.microsoft.com/.default"; grant_type="client_credentials" }
$tok.access_token.Substring(0,20)
If that prints 20 characters, authentication works. If it errors, the tenant ID or the secret is wrong — most often the Secret ID was copied instead of the Value. Then send:
$body = '{"message":{"subject":"Missivus pre-flight","body":{"contentType":"Text","content":"Graph app-only send OK"},"toRecipients":[{"emailAddress":{"address":"you@example.com"}}]},"saveToSentItems":false}'
Invoke-WebRequest -Method Post -Uri "https://graph.microsoft.com/v1.0/users/noreply@example.com/sendMail" -Headers @{ Authorization = "Bearer $($tok.access_token)" } -ContentType "application/json" -Body $body | Select-Object StatusCode
StatusCode 202 and an email in your inbox from your company name = the Microsoft side is
done. 403 = the policy is still propagating or admin consent is missing; 404 = the mailbox
has not finished provisioning — wait and retry.
Step 6 — clean up and sign out. The secret was typed into this window, so clear it:
Remove-Variable Secret,tok,body
Disconnect-ExchangeOnline
Then close the PowerShell window.
Adding another tool later (Uptime Kuma, a CRM, anything that sends as noreply@): give it its
own app registration (Parts 1–3), then run only Step 3 again with that app's Application (client)
ID. The group from Step 2 is reused; you never create a second one.
Part 6 — Install the plugin
Copy the plugin so it lands at plugins/Missivus inside your Matomo installation, then activate it.
From the release zip:
cd /path/to/matomo/plugins
unzip /path/to/Missivus-<version>.zip      # creates plugins/Missivus/
chown -R www-data:www-data Missivus
cd ..
./console plugin:activate Missivus
Or straight from git:
cd /path/to/matomo
git clone https://github.com/Solvetus/missivus-matomo.git plugins/Missivus
./console plugin:activate Missivus
Run ./console as your web server user (sudo -u www-data ./console …) so file ownership stays
consistent.
Upload via the Matomo UI (Docker or locked-down installs)
If you have no shell on the machine — or Matomo runs in a container where dropping files into
plugins/ is awkward — you can upload the zip through Matomo's own interface instead. It takes one
temporary setting change.
Why it is off by default. enable_plugin_upload lets any superuser upload a zip that Matomo
then unpacks into plugins/ and executes. That is arbitrary PHP running as your web server user:
one compromised superuser account, or one careless one, and the whole server is gone. Matomo ships
it off, and the safest way to use it is to turn it on for the five minutes you need it and turn it
straight back off. The shell route above avoids the trade-off entirely, which is why it is the
recommended one.
Step 1 — turn it on. From the Matomo directory:
./console config:set --section=General --key=enable_plugin_upload --value=1
In Docker, run the same console command inside the container, as the web server user — replace
<container> with your Matomo container's name (docker ps will show it):
docker exec -u www-data <container> php /var/www/html/console config:set --section=General --key=enable_plugin_upload --value=1
Step 2 — upload and activate. In Matomo, go to Administration (the cog) → Platform → Plugins
and click Install a new plugin at the top of the list. Choose Upload a plugin, pick the
Missivus-<version>.zip file, and click Upload plugin. Matomo unpacks it into plugins/Missivus
and shows it in the plugin list. Find Missivus in that list and click Activate.
If the upload page does not appear, Matomo has not picked the setting up yet: reload the page, and check the command in step 1 ran against the same installation Matomo is serving.
Step 3 — turn it back off. As soon as the plugin is activated, close the door again. This is best practice, not optional housekeeping — leaving it open is a standing remote-code-execution path for anyone who ever gets a superuser session:
./console config:set --section=General --key=enable_plugin_upload --value=0
docker exec -u www-data <container> php /var/www/html/console config:set --section=General --key=enable_plugin_upload --value=0
Turning it off does not affect the plugin you just installed. Repeat steps 1–3 when you next need to upload an update, or use the shell route.
Activating the plugin on its own changes nothing: Missivus starts switched off, and Matomo keeps using whatever mail settings it already had.
Part 7 — Configure Matomo
Tell Matomo the From address
Edit config/config.ini.php and make sure the [General] section contains:
[General]
emails_enabled = 1
noreply_email_address = "noreply@example.com"
Application-only sending can only send as the shared mailbox, so Missivus forces that From address regardless. Setting it here means Matomo and Microsoft agree, and no warnings appear in your log.
Enter the credentials
Go to Administration → System → General settings in Matomo and scroll to Missivus. Fill in:
Field Value Directory (tenant) ID from Part 1 Application (client) ID from Part 1 Authentication method Client secret (or Certificate if you chose Option B) Client secret the Value you copied in Part 3 Sender mailboxnoreply@example.com from Part 4
Click Save. That is all the configuration Missivus needs — you do not have to touch
config.ini.php for any of it.
Optional: keep credentials in a file instead
If you would rather your credentials lived with your configuration than in Matomo's database — which
suits a server you deploy by pulling code — add a [Missivus] section to config/config.ini.php:
[Missivus]
tenant_id = "00000000-0000-0000-0000-000000000000"
client_id = "00000000-0000-0000-0000-000000000000"
auth_method = "secret"
client_secret = "the Value you copied in Part 3"
sender_mailbox = "noreply@example.com"
For a certificate instead, replace the last two credential lines with:
auth_method = "certificate"
certificate_path = "/etc/matomo/secrets/missivus.pem"
Anything set here appears in the settings page marked set in config file, cannot be edited from the UI, and is never written to Matomo's database.
Each key can also come from an environment variable, which beats both: MISSIVUS_TENANT_ID,
MISSIVUS_CLIENT_ID, MISSIVUS_AUTH_METHOD, MISSIVUS_CLIENT_SECRET,
MISSIVUS_CERTIFICATE_PATH, MISSIVUS_CERTIFICATE_PASSPHRASE, MISSIVUS_SENDER_MAILBOX.
Turn it on
In Administration → System → General settings → Missivus, tick Send email through Microsoft Graph and click Save.
Part 8 — Test it
On the same settings page, enter your own address next to Send a test email and click the button.
The button is disabled until the saved settings are complete and Missivus is switched on, and it tells you which of those is missing. The test sends with what is stored, not with what is on screen, so if you have just typed something into a field, click Save first — the button enables itself a moment later, without a page reload.
- Success — you will have an email within a minute. Microsoft accepting the message is not quite the same as delivering it, so do check it actually arrives.
- Failure — the exact error Microsoft returned is shown on the page. See the table below.
As a second, independent check, sign out of Matomo and use Lost your password?. That exercises
the real Piwik\Mail path rather than the test button.
When it does not work
What you see What it means FixAADSTS7000215: Invalid client secret provided
The secret is wrong, or you copied the Secret ID instead of the Value
Create a new secret and copy the Value column
AADSTS700027 or invalid_client with a certificate
The certificate Matomo is using is not the one uploaded to Entra
Re-upload missivus.crt; check certificate_path points at the PEM holding both the key and the certificate
AADSTS900023: Specified tenant identifier is not valid
Wrong tenant ID
Recopy Directory (tenant) ID from the Overview page
ErrorAccessDenied / Access is denied on send
The application access policy does not cover this mailbox, or admin consent was never granted
Re-run Test-ApplicationAccessPolicy from Part 5; re-check the green tick in Part 2
ErrorAccessDenied only on large attachments
Mail.ReadWrite is missing
Add it in Part 2 and grant admin consent again
MailboxNotEnabledForRESTAPI
The sender address is not a real Exchange Online mailbox
Check the shared mailbox exists and the address is spelled right
The mailbox is either inactive, soft-deleted, or is hosted on-premise
The mailbox has not finished provisioning
Wait fifteen minutes and try again
certificate file is not readable at …
File permissions
chown root:www-data and chmod 640 the PEM, and check the path
the private key … could not be loaded
Wrong passphrase, or the PEM has no PRIVATE KEY block
Rebuild the PEM: cat missivus.key missivus.crt > missivus.pem
Nothing happens, no error
Missivus is switched off, so Matomo used its own settings
Tick Send email through Microsoft Graph
The Send test email button is greyed out
The saved settings are incomplete, or Missivus is switched off
Read the note under the button — it names what is missing. Fill it in and click Save
Missivus writes every failure to Matomo's log at error level, so Administration → Diagnostic → System Check and your Matomo log are the next place to look. Secrets are redacted before anything is logged.
If Entra rejects the certificate assertion with a signature error and you have checked everything
above, add certificate_algorithm = "RS256" to the [Missivus] section. Missivus signs with PS256
by default, which is what Microsoft's current documentation specifies; RS256 is the older algorithm
that Entra also accepts. This should not be necessary — please open an issue if it is.
Keeping it working
- Diary the credential expiry. A certificate or secret that expires stops mail dead. Replace it
a week early: upload the new certificate, change
certificate_path, test, then delete the old one from Entra. - After a Matomo upgrade, press Send test email once.
PLAN.mdlists exactly which Matomo internals this plugin depends on if something does break. - To turn it off, untick the setting, or run
./console plugin:deactivate Missivus. Matomo reverts to its own mail settings immediately, with nothing to clean up.
Getting help
Open an issue at https://github.com/Solvetus/missivus-matomo/issues. Never paste a client secret, a certificate, or a PEM file into an issue.
If you would rather have this set up for you, Solvetus does paid installation and support.
Does the shared mailbox need a Microsoft 365 licence?
No. An Exchange Online shared mailbox is free, up to 50 GB, and needs no licence assigned to it — which is the point. Missivus authenticates as an application, not as the mailbox, so nobody has to sign in as it and nothing has to be paid for it. (A licence is only required if you want to convert it to a user mailbox, put it under litigation hold, or give it an archive.)
Why not just use SMTP? Matomo already supports it.
Because it is on borrowed time, and because of what it costs you today. Microsoft is retiring basic-authentication SMTP AUTH for Microsoft 365: it is disabled by default for existing tenants from the end of December 2026, unavailable to new tenants from 2027, and the final removal date will be announced in 2027 (see Microsoft's announcement and updated timeline). What remains after that is SMTP AUTH with OAuth2, which Matomo's PHPMailer path does not speak. And even while it still works, SMTP means a licensed user account whose password sits on your server as a shared credential, with no way to scope what it can do.
Graph with application permissions has neither problem: there is no password, no user, no licence, and the credential is scoped by Exchange to one mailbox.
Client secret or certificate — which should I use?
Start with a client secret. It is two clicks in Entra, there is nothing to manage on the filesystem, and it is the documented route throughout the guide.
A certificate is stronger, because the secret never travels in a request body: Missivus signs a short-lived assertion with the private key instead. Use it if your security policy asks for it, or if you would rather rotate a file on disk than a value in a database. The trade is that you now have a PEM file to keep readable by the web server and nobody else, and to replace before it expires.
Both are fully implemented and tested. You can switch between them at any time from the settings page.
How do I rotate the client secret?
Entra secrets expire — 24 months at most, and 6 months is the default. Rotation is deliberately boring:
- In your app registration, Certificates & secrets → New client secret. The old one keeps working until it expires, so there is no outage window.
- Copy the new secret Value (not the Secret ID).
- Paste it into Administration → System → General settings → Missivus → Client secret, and
click Save. If you keep credentials in
config.ini.phpor an environment variable instead, change it there and reload PHP. - Press Send test email to confirm.
- Delete the old secret in Entra.
Missivus caches the access token, not the secret, for at most 55 minutes — so the changeover is immediate for new tokens and nothing needs restarting.
What happens with attachments over 3 MB?
They still send. Graph's inline attachment limit is 3 MB, and the whole sendMail request is bounded
at 4 MB, so above that ceiling Missivus automatically switches to Graph's large-file path: it creates
a draft, uploads each large file in chunks through an upload session, then sends the draft. The
decision is made per message and is total-aware, so several medium files that add up also take the
safe path.
There is no setting for this and no way to configure it wrongly — scheduled-report PDFs must never fail on size.
Why does the guide ask for Mail.ReadWrite as well as Mail.Send?
Only for that large-attachment path. Creating a draft message and opening an attachment upload
session are not covered by Mail.Send; Microsoft requires Mail.ReadWrite for them.
If you never send attachments over 3 MB you can grant Mail.Send alone. If you do, and
Mail.ReadWrite is missing, the failure is loud and names the permission rather than being
mysterious.
Both permissions are scoped by the same application access policy, so Mail.ReadWrite grants nothing
outside the one shared mailbox.
Is the application access policy really necessary?
Yes — treat it as part of the installation, not as hardening you might do later.
Without it, Mail.Send as an application permission means the app can send as any mailbox in your
tenant. The policy narrows it to one. That single step is what turns "an app that can impersonate
everybody" into "an app that can send as noreply@". The guide gives you the exact commands, including
Test-ApplicationAccessPolicy to prove that another mailbox comes back Denied before you go any
further.
Note that Exchange scopes a policy to a group, not a mailbox, so the guide has you create a security group whose only member is the shared mailbox. Nobody ever sends to that group; it exists so the policy has something to point at.
The test email button is greyed out. What now?
The test sends with the settings that are saved, not with what is currently typed on screen, so the button stays disabled until the stored configuration is complete and Missivus is switched on. The note under the button says which of those is missing.
Fill in the fields, tick Send email through Microsoft Graph, and click Save. The button enables itself a moment later — no page reload needed.
My Matomo runs in Docker and I cannot drop files into plugins/. Can I upload the zip?
Yes, with one temporary setting change. Matomo ships enable_plugin_upload off because it lets
any superuser upload a zip that Matomo then unpacks and executes — arbitrary PHP running as your web
server user.
The guide's Upload via the Matomo UI section walks through turning it on from inside the container, uploading and activating the plugin, and — importantly — turning it back off again afterwards. Leaving it on is a standing remote-code-execution path for anyone who ever gets a superuser session.
Will Missivus break my email if I install it and do nothing?
No. It ships switched off. Activating the plugin changes nothing at all: Piwik\Mail keeps using
whatever transport Matomo was already using until you tick Send email through Microsoft Graph.
Deactivating the plugin restores the stock transport with no cleanup.
The optional fall back to Matomo's own mail settings switch is also off by default, deliberately: a failure you can see beats an email that quietly goes nowhere. Either way, every Graph failure is written to Matomo's log at error level.
I got an error code from Microsoft. What does it mean?
The common ones, in full in the installation guide's troubleshooting table:
Code Usually meansAADSTS7000215
Wrong client secret — often the Secret ID was copied instead of the Value
AADSTS900023
Wrong Directory (tenant) ID
AADSTS700027
The certificate Matomo is using is not the one uploaded to Entra
ErrorAccessDenied
The application access policy does not cover this mailbox, or admin consent was never granted
ErrorAccessDenied only on big attachments
Mail.ReadWrite is missing
MailboxNotEnabledForRESTAPI
The sender address is not a real Exchange Online mailbox
"mailbox is either inactive, soft-deleted…"
The mailbox has not finished provisioning — wait and retry
Secrets are redacted before anything is logged or shown, so you can paste these errors into an issue safely — but do check them over first.
Does it work with Matomo for WordPress, or with other Matomo plugins that send email?
Any email that goes through Piwik\Mail goes through Missivus — that includes password resets,
scheduled report PDFs, alerts, and third-party plugins that use Matomo's mail layer properly. A
plugin that opens its own SMTP connection instead is untouched by any of this.
Missivus for Matomo has not been tested running under Matomo for WordPress specifically. If you run Matomo on WordPress, the supported route is the sibling missivus-wordpress plugin, which vendors the same Microsoft Graph transport for WordPress's own mail layer directly, rather than this Matomo plugin running inside a WordPress-hosted Matomo.
The WordPress sibling has shipped — along with missivus-nextcloud and missivus-ghost, which send Nextcloud's and Ghost's own outbound email the same way. See missivus.com for all four.
Which version do I install — Matomo 5 or Matomo 6?
Matomo version Missivus release line Branch PHP Matomo 5.x 0.1.xmain
7.2.5 or later
Matomo 6.x
1.x
6.x-dev
8.1 or later
The Marketplace offers the right line automatically, based on the Matomo version you have installed. A manual install from GitHub takes the latest tag on the branch matching your Matomo.
Where do I report a bug, or a security problem?
Bugs and feature requests: the issue tracker.
Security problems: email security@missivus.com instead, and please give us a chance to fix it before it becomes public. docs/SECURITY.md documents what has already been reviewed.
Version
0.1.6
License
Keywords
graph, microsoft, email, mail, office365, microsoft365, exchange, smtp, entra
Last Updated
Sep 13th 2026
Requirements
Matomo >=5.0.0-b1,<6.0.0-b1
PHP >=7.2.5
Matomo 5.x, Matomo 6.x
Downloads
1408
Changelog
Support
support@missivus.com
View and download this plugin for a specific Matomo version:
- Matomo 5.x (currently selected)
- Matomo 6.x