This plugins allows you to configure and track Custom Variables in your Matomo Analytics.
This feature used to be part of Matomo. However, we no longer plan to further develop custom variables and only fix important bugs or security issues and we might stop supporting Custom Variables in the future.
We therefore highly recommend using Custom Dimensions instead which is directly available within your Matomo. Learn more about the advantages of Custom Dimensions.
Warning: Depending on the database size of your Matomo this plugin may take a long time to install.
Custom Variables User Guide
What is the value of Custom Variables?
Matomo offers a Custom Variables feature for collecting custom metrics related to your page views and visits. For example, if you want to track things such as the Tags associated with a certain page that is viewed or the user role of somebody navigating through your website. This kind of data is typically managed through your CMS (Content Management System) and is likely to be different for each site so it needs a little configuration to get started.
Custom Variables vs Custom Dimensions
Custom Variables serve a similar purpose to Custom Dimensions, however, Custom Dimensions have many advantages over Custom Variables so in most cases you should use Custom Dimensions.
In fact, we generally recommend that the only time that you should use Custom Variables is when you need to store more than one value for the same dimension. For example in blogging and social media systems it is common to associate multiple tags with a post. In this case you could collect all of the tags within your analytics for analysis which wouldn’t be possible with Custom Dimensions.
The Anatomy of a Custom Variable
Custom Variables consist of four different elements, all of which are required.
- Index - This is a unique numeric ID which is typically between 1-5 that references the data. You can hold up to 5 custom variables for each scope by default, however if you are using Matomo On-Premise, it is possible to configure it to add more than 5 custom variables for each scope.
- Name - This is a user-friendly label to identify the variable. For example, Tag.
- Value - This is the actual value of the variable. For example, if the variable is tracking tags an article about Matomo could be filed as “Marketing”, “Analytics” or both.
- Scope - This defines whether the variable is page scoped i.e. attached to the page it is loaded on or visit scoped and connected with the visitor that is on the page.
All of the fields are limited to a total of 200 characters.
Example Custom Variables
To help you understand the different elements we have provided an example Variable for each of the potential scopes below.
Visit Scope Dimensions: User Role
This is useful because in many cases users can have multiple roles on a website. For example somebody who is both Staff and a Moderator.
Sample Values:
- Index: 1
- Name: User Role
- Value: Staff
- Scope: visit
Action Scope Dimension: Tags
A common design pattern for websites on platforms like WordPress is filing content under a single “Category” while adding several “Tags” to add more specific definitions to the content. For example an article might be found in the “Marketing” category while also holding tags for “Analytics” “Matomo” and “Plugins”.
Sample Values:
- Index: 1
- Name: Tags
- Value: Marketing
- Scope: action
How to Get Started with Custom Variables
While Custom Variables are available by default in Matomo Cloud, they are no longer installed by default in Matomo On-Premise. Therefore if you do want to use them, the first thing that you need to do is install the Custom Variables plugin. You can find instructions on how to do that below.
How to install the Custom Variables Plugin
How to install the Custom Variables Plugin for Matomo On-Premise
- Log in to your Matomo Dashboard with a Super User account.
- Click the Cog Icon in the Top Menu to visit your Matomo settings.
- Go to the Marketplace page within the Platform settings.
- Find the Custom Variables plugin and click the big green Install button. (You may need to confirm your password at this stage.)
- The plugin will be downloaded to your Matomo instance and you can click the big green Activate Plugin button to start using it. Note: It is also possible to activate it via the command line by using the following command: ./console plugin:activate CustomVariables
How to install the Custom Variables Plugin for WordPress
- Log in to your WordPress dashboard.
- Go to the Marketplace section of the Matomo Analytics menu.
- Download the Custom Variables Plugin.
- Tap on Add New within the WordPress Plugins menu.
- Click Upload Plugin and follow the prompts to upload the Custom Variables plugin zip that you just downloaded.
- Click Activate to enable the plugin with Matomo.
How to add Custom Variables to your Web pages
Setting up Custom Variables will generally require that you are comfortable editing code or have access to a developer who can configure them for you. If you are already creating custom code to pull data from a content management system then it likely makes sense to set up your tracking within that custom code at the same time. However, in some cases it is possible to extract data using Matomo Tag Manager and there are details on that process below.
How to set up the HTTP Tracking API with Tag Manager
The actual code for setting Custom Variables is fairly simple. It starts by wrapping the function with a _paq.push([ ]); which sends it to Matomo. Next, the setCustomVariable() is set and within that are the four elements: index, name, value and scope.
_paq.push([setCustomVariable(index, name, value, scope = "visit"]);
It is important that you use a unique index for each value as the index will only ever store the most recent value. However, you can use the same name against multiple indexes so that you can store multiple values for a metric. You can find examples of this for both scopes formatted for the HTTP tracking API below.
Visit Scoped Custom Variable Examples
In this example we are tracking a Role variable where website users can hold multiple roles at the same time. In this case it is associating both a “Staff” and “Moderator” role with the visitor that will persist for all actions within their entire visit.
_paq.push([setCustomVariable(1, "Role", "Staff", scope = "visit"]);
_paq.push([setCustomVariable(2, "Role", "Moderator", scope = "visit"]);
Page Scoped Custom Variable Examples
In this example of a Page scoped custom variable multiple tags are associated with a specific page view. In this case both the “Guide” and “Videos” tag will be associated with the pageview, however this won’t be associated with other page views unless the same code is also present on those pages.
_paq.push([setCustomVariable, 1, "Tag", "Guides", scope = "page"]);
_paq.push([setCustomVariable, 2, "Tag", "Videos", scope = "page"]);
When using the HTTP tracking API you must make sure that you set your custom variables before trackPageview is called. You can find more information on doing this via Matomo Tag Manager further down the page.
Tracking/Capturing Custom Variables via Matomo Tag Manager
While it may not always be the easiest way to pull data from your existing content management system, it is also possible to set up Custom Variables with Matomo Tag Manager. The specific method for collecting data will vary depending on what you would like to collect but the general configuration is detailed below.
- You will need to start out by installing and configuring Matomo Tag Manager if you haven’t already.
- Next, Set up a Matomo Analytics Tag with the Tracking Type set to Initialise tracker only. Don’t track anything. This is because we will be creating separate tags to ensure that tracking works correctly. You will also need to click to Show advanced settings and look for the Priority text field. By default, this is set to 999, however you should change this to 1 so it becomes one of the first tags to fire when a page is loaded.
- Next, you need to set up the tag that will actually track your pageviews. This can be done using a Custom HTML tag and should contain the following code:
<script>
  var _paq = window._paq = window._paq || [];
  _paq.push(['trackPageView']);
</script>
You will also want to ensure that this tag fires after your existing Priority for this tag so make sure you click Show advanced settings and update the Priority text field to 999 so that it always fires after the initial tag. - And finally you need to set up a Custom HTML tag for any Custom Variables that you would like to set.
<script> var _paq = window._paq = window._paq || []; _paq.push(['setCustomVariable', 1, 'User Role', 'Guest', scope = 'visit']); _paq.push(['setCustomVariable', 1, 'Tag', 'Marketing', scope = 'page']); _paq.push(['setCustomVariable', 2, 'Tag', {{dataLayer - Tags}}, scope = 'page']); </script>You can combine several variables in a single tag if it makes sense, but you will need to ensure that the tag only fires when relevant. For example, if you create a Tags variable for tracking tags associated with pageviews, then you will need to create a Trigger that only fires when a page is loaded with the relevant tags. You can learn more about triggers here. Any tags that you create containing variables will need to be set to a Priority number somewhere between your first tag 1 and your pageview tag 999. This is so the tags all load in the correct sequence. For example:- Matomo Analytics Init Tag - Priority 1
- Custom Variables Tag - Priority 99
- Pageview Tag - Priority 999
Advanced: Output custom variables in your CMS dynamic code with the PHP API
If you are a developer then you may also want to look at our case study where we show how one website integrated dynamic custom Variables with WordPress CMS using the PHP Tracking API. You can also find full documentation on how to set custom variables this way in the official PHP tracking development documentation here.
How to Analyse Custom Variables
You can find the Custom Variables report within the Visitors section of main navigation down the left hand side of the page. Custom Variable reports are shown in Table format by default, however, like most tables in Matomo there are alternative visualisations available.
The specific metrics available vary depending on the scope of the custom variable. The number of Actions will be shown for both Page and Visit scoped variables, but Visit scoped variables also offer the following additional metrics:
- Visits
- Unique Visitors
- Users
When reviewing Action scoped results, these values are simply blank and replaced with a hyphen as no relevant data is stored.
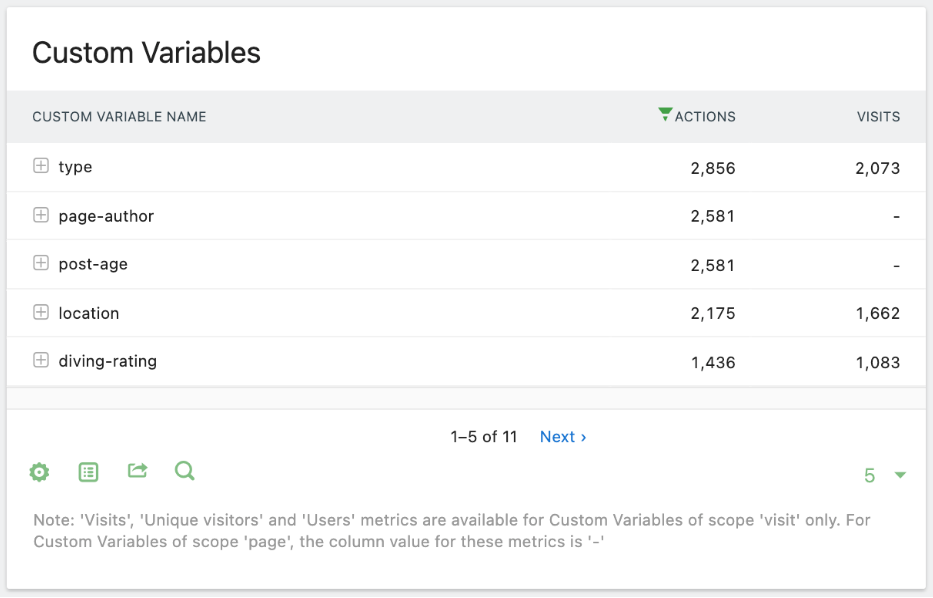
Hierarchical vs Flat Analysis
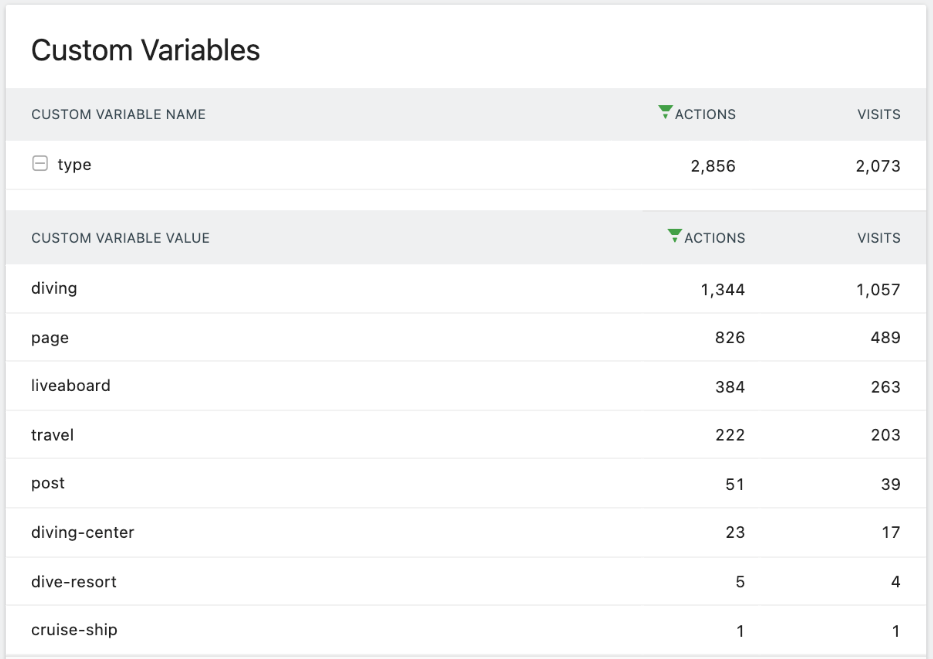
By default variable data is displayed in hierarchical format. This means you can click on the plus icon for any of the top level names to reveal the values stored against that specific Name for easy comparison. Below is an example comparing different page type on a dive review website:
Alternatively you can flatten the table to compare disparate metrics against each other. For example comparing the success of certain page types against content from certain authors. Not all comparisons will make sense so it is up to you to consider whether this view is relevant for the custom variables tracked on your site.
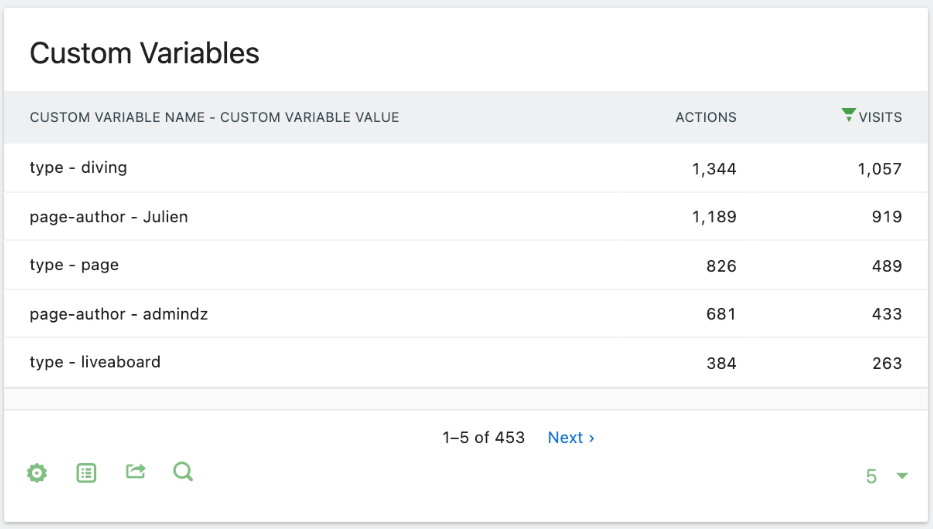
You can switch between these modes by hovering your mouse over the table to reveal a green icon menu in the bottom left of the screen. You can then click on the cog icon which provides several options including switching between hierarchical and flat data views, exclude rows with low data or pivot your data.
Resources
- Developer JavaScript Tracking Guide for Custom Variables
- Developer Hooks for Custom Variables in the Reporting API
- How to Extend Custom Variable Limits for Matomo On-Premise
- Advantages of Custom Dimensions over Custom Variables
- Developer Documentation of REST API for Custom Variables
View and download this plugin for a specific Matomo version:
- Matomo 4.x
- Matomo 5.x (currently selected)